How to send an Encrypted Email
Sending an encrypted email is required when you must email someone HIPAA protected information. Encrypting the email makes sure that only the intended recipient will be able to view the message or attachment. There are multiple ways to send encrypted emails, see below for each of the methods. Depending on the situation, using one or the other may be preferred.
Use the Barracuda Email Protection add-in for Outlook
- Start a new message and look for the Barracuda Essentials Encrypt Message button and click it.

- Once you click the button, a screen will slide out from the right-hand side of the message, this is where you can indicate whether the message will be encrypted or not.

- Click on the slider where it says Encryption off to enable Encryption of the message. Once you click it, the dot will move to the right and it will say Encryption On.
Please note that once you enable Encryption of the message, 3 things will change.
- There will be a message letting you know NOT to remove the attachment that was added. You can add attachments, just do not remove the auto-added attachment as that will cause encryption of the message to fail.
- There will be an attachment on the email, as above, DO NOT remove it.
- The Encryption On will now have a blue background instead of the gray background when it was off
Once you have Enabled Encryption it is safe to click the x to close the right-hand slide out
- Once you have enabled Encryption of the message, just fill out your message as normal and attach any attachments that you need, then hit send.

Use the Barracuda Email Protection Add-in for Outlook Web
- Compose a new message, then look for the Barracuda Essential button and click it. Much like in Outlook, this will pop-out a section on the right-hand side.

- Click the Encryption off button to enable encryption, after clicking it the dot will move to the right and it will change to Encryption On.
Please Note: Several things will change about the message once Encryption is on. The message below will tell you that you should NOT remove the attachment that was added as it will send un-encrypted if you do that. You can leave the attachment it added and add as many other attachments as you want.
Once you have Enabled Encryption, it is safe to click the x to close the right-hand slide out.

- After Encryption has been enabled, please fill out the message as you would normally and add any attachments you need to send. Once filled out, hit Send.

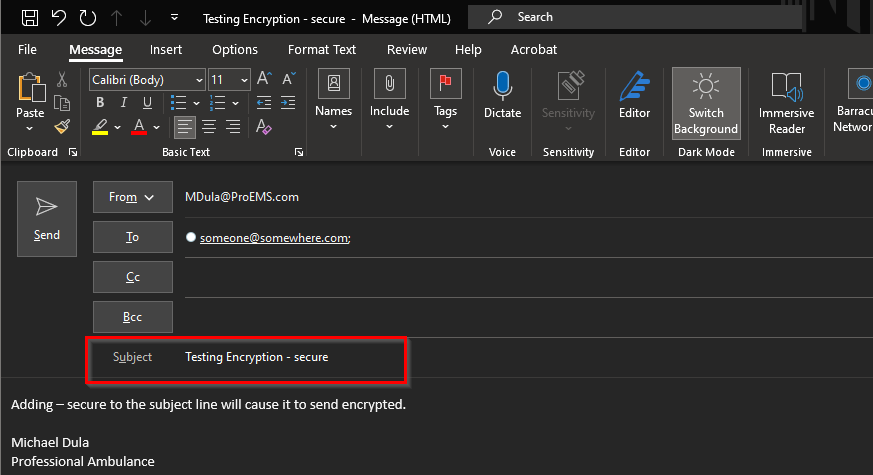
Use words in the Subject line to Encrypt your message
The following can be added to the subject of your email to trigger email encryption:
- - secure
- - secured
- -secure
-
-secured
Note: the above will also match even if one, several, or all letters are capitalized. Ex: - Secured
Here is an example of the usage of this method:
